Wednesday, August 4, 2010

CTMH PANELIST REVIEW

I am a little behind in my postings.    This is a project that I did for Jill Rancourt  - The Scrapoholic for her Close ToMy Heart review. She sent us a package of CTMH goodies and set us free to try them out and share with you all.

Pics are first:


I have used CTMH stamps in the past and have a couple of sets.  I really like them. They take the ink really well and give a great smooth clear image. This project is the first that I have used their papers.  I really love this set of patterned papers.  The bright colors are so perfect for a "Mickey" themed album or mini-book.  My only complaint was that I really wanted to use the patterned paper on the back side just as much.  It was a tough decision.  I kept the scraps so that I could maybe to a small 6" x 6" layout.  I will probably purchase their products, but I am trying to clear out my extensive collection of papers right now until I am gainfully employed again.  But they are definitely on my list.

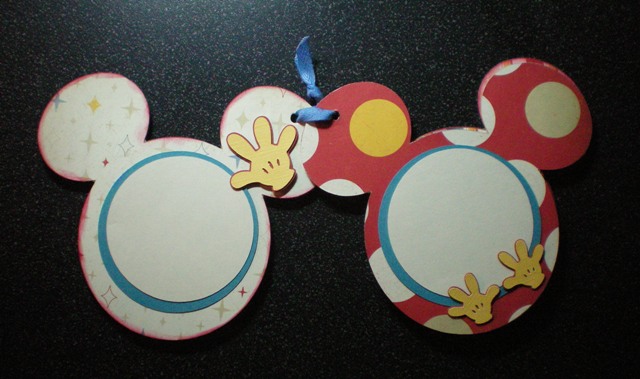
Some of the other products in the package are other 12 x 12 sheets of double sided paper.  I really like the colors and the coordinating patterns.  On this project I used my Cricut with Design Studio.  I cut the book at about 5-1/2".  Of course the dimensions aren't exact due to Mickey's ears.  The CTMH paper cut like butter, no problem.  Sometimes other patterned papers are too thin to cut without getting drags or tears. I didn't have one bad cut.  This is a really good quality pattern paper. I used cardstock from my stash, sorry I don't have brand names to give you, but it was very easy to find matching colors.  Even the difficult red shades were not a problem.  I'm sure that CTMH has coordinating cardstock, but it was nice to know that I could match with my existing paper stash.  The Bingo Style letters have been in my stash for a long time.  They didn't even have a label left on the package to be able to give you a brand name.  The distressing around the edges was done with Color Box Pigment Cat's Eye - Chianti.  I do not have any CTMH ink pads at this point, but I would definitely buy them in the future.  My sister has used them and likes them.

When you get a minute, you need to head on over to Jill's Blog: thescrapoholic.blogspot.com.  Or you can contact her at TheScrapoholic@gmail.com.  She is also on Facebook.com/TheScrapoholic, etsy.com/shop/thescrapoholic, or twitter.com/TheScrapoholic.

 I am still working on finishing some projects and will hopefully have them posted by the end of the week.

Tuesday, June 22, 2010

Brick with Beads


May's Card of the Month theme was Brick with Beads.  I decided to make a pillow box for my card this month.  I was handing out a lot of gift cards between birthdays and graduations. 

The pillow box cut is from Easter 2010.  I used Design Studion to cut it, but the end size is about 3" x 5.5".  The brick scallop and indulge are both cut from Graphically Speaking and then the yellow insert was cut using George.  The bead was from upstairs in the attic.  I have a ton of beads left from 20 years ago when beading was popular.   Head on over the this thread to see all of the other amazing cards: http://www.cricut.com/messageboard/tm.aspx?m=6796467&mpage=1&key=?

Tuesday, June 1, 2010

MPS Father's Day Challenge


Yikes, I'm down to the wire here.  My Pink Stamper is having a drawing on her site: http://www.mypinkstamper.com/ for a Cricut Expression.  The challenge was to create a Father's Day item.

I put together this very easy card this morning.  I used old leftover Making Memories Travel paper from a 6 x 6 pad.  The Dad's Day cut is from the Designer's Calendar cartridge cut at 1-1/2" and the grill is from the From My Kitchen Cartridge cut at 3".  The ribbon is some more leftover ribbon. 

 The finished card size is 4-1/4" x 5-1/2".

Saturday, May 15, 2010

Open House Invite Word Book


I wanted to share the Open House invitation that I made for my dear friend's daughter.  I made 50 for her and I think they liked them.  It's hard to imagine that she is graduating, she is supposed to stay little forever. I am sure that she is going to do great things.

I used Design Studio to create this invitation. I started with the square from George and welded shadow letters from Base Camp. Then I added the regular Base Camp letters (with no shadow) to the pages. Each page was adjusted to see each letter at the edge of the pages.


After cutting all the pages and letters I glued the letters to the pages. The picture with Open House and open house detail pages were printed and layered.

The 2010 shadow was welded with Design Studio and the white numbers were then adjusted to fit on the shadows. I placed the 2010 over some decorative ribbon.

The book was then stapled with oversize embellishment staples.  I didn't add a lot of extra embellishments since there were a few layers and I wanted it to go through the mail without being mangled.

The finished size is 4" - 5-1/2"

Thanks for looking.

Monday, May 10, 2010

Twisted Papers Vintage Card


Whew, it's been a while since I posted anything.  It took me a week to recover from the challenges I did at My Pink Stamper National Scrapbook Day weekend.  I have also been working on some unique open house invitations for a dear friend's daughter.  I will post them when they are done.

This card was my entry for the Card of the Month Swap on Cricut.com.  This month's theme was Ecru with Embossing.  You can see everyone's creations at: http://www.cricut.com/messageboard/tm.aspx?m=6661083.

The picture was a free download from Twisted Papers a month or so ago.  You should visit their website to see all of the really great vintage items they have.  They also have links to their store.  The link is:  http://www.twistedpapers.com/.

OK, now for the details.  I used the EK Success Double Moracco Lace border punch for the border.  The background paper is from a Heidi Grace Collection I purchased at Joann's a long time ago. The little message sign is a cut from Home Accents cartridge.  And the pearls were some leftovers I had laying around.  They weren't in their package, so I'm sorry, I don't know the brand.  I almost forgot the embossing part.  I embossed the picture using the Cuttlebug Stylized Flowers folder.
The finished size is 4-1/4" x 5-1/2".

Off to Brick with Beads for next month.

Tuesday, May 4, 2010

Where in the world is ScrapGuy?

Susan and I have been following a blog by Bryan at http://www.scrapguy.blogspot.com/.  He just recently went on a trip to South Asia and India and is sharing some great travel videos on his blog.  His is also sharing some great blog candy.  Check out the first entry at: scrapguy.blogspot.com.  He is giving away a beautiful natural pearl and crystal necklace.  I would love to travel with him.

His first video entry is at Hong Kong Harbor.  Very foggy that day, but still incredible.  Follow along.

NSD Challenge # 2 - "Getting Scrappy"


I hope this isn't too late - I think I am an hour ahead so here goes nothing.  If it's too late, that is OK too! 

My entry for NSD Challenge #2 - Getting Scrappy.  The Challenge: use your scraps.
CC - Graphically Speaking

Monday, May 3, 2010

NSD Challenge #9 - "Take Shape"


"Take Shape" - this is the NSD Challenge #9.  Thankfully, the challenge isn't to get into shape, but to cut a shaped card, layout, or project.  I just finished off a box of chocolate from Easter.

I used Design Studio again to weld the house from pg 28 on Create A Critter.  What a cute pink piggy they have on that page too.  The paper is from K & Co. Amy Butler Designer Paper.  I've had this paper forever too.  The "we've moved" is from Beyond Birthdays cartridge.  I cut that on Design Studio too so that it would fit the roof.   I'm thinking Susan made a big mistake - huge mistake by giving me this cartridge.

The finished size is 4-1/4" x 5-1/2".

NSD Challenge #4 - "I Like You Least"


Hum - what cartridge do I like least or use the least.  The challenge: use a cartridge you thought you had to have and then don't use very much.  I have to say mine is Jasmine.  I absolutely love the style of this font, but I have such a hard time getting it to cut cleanly.  I found that if I use Design Studio or up the speed on the Cricut, it cuts better.  Sometimes.

I used Design Studio to cut this card front.  I used the rectangle from George and placed the Warmest Wishes from Jasmine on top of it.  I had the bottom of the rectangle cut across the center between warmest and wishes.  After cutting I glued the blue over the brown.

The finished card size is 5-1/2" x 4-1/4"

NSD Challenge #5 - Teacher Appreciation Day


I'm still working on challenges for My Pink Stamper.  This journal if for the NSD Challenges #5 - "Teacher Appreciation Day".  The Challenge:  make something for Teacher Appreciation Day or for someone you appreciate.  I thought that I would make up a journal for a teacher for their summer break.  I decorated this composition notebook with summer break paper from DCWV Summer Stack.  This stack is a couple of summers old, but still seems to work.  I cut the letters at 1" with Base Camp. 
The finished size is 7-1/2" x 9-3/4".

Everyday Cricut Gigantic National Scrapbook Day Giveaway

I'm not sure how I missed this great giveaway, but Everday Cricut is giving away a Cricut Expression for Nation Scrapbook Day.

The link with instructions on how to enter is here:  Everyday Cricut "Gigantic-national-scrapbook-day-give-away".

Please visit their site, they have new projects everyday with very helpful videos.

Sunday, May 2, 2010

NSD Challenge #3 - "Thinking Outside the Box"


This is a quick layout I made for My Pink Stamper NSD Challenge #3 - "Thinking outside the box".  The Challenge: use something on a layout you wouldn't normally use.

I decided to use Create A Critter for this layout.  The clouds are cut at 2-1/2", the moon is cut at 3" and the Sweet Dreams is cut at 2".  My "outside the box" is to use cotton balls on the clouds. I'm sure all of the scrapbooking purists are cringing right now, sorry! The finished size is 8" x 8"

NSD Challenge #11 - "Colors of the Rainbow"


I'm on a roll now.  Another card for the NSD Challenges at My Pink Stamper.  The Challenge: make a project using one or all of the colors of the rainbow.

I used my scraps again, so I'm not sure what the paper companies are for this card.  I laid out the papers, taped and cut out a square using the 5-1/2" x 5-1/2" card base.  I'm sure that isn't the most professional way to do it, but that's what I did.  The Love cut is from Home Accents, cut at 2-1/2".

NSD Challenge #8 - "Love My Color"


This card is my entry for the NSD Challenge #8 - "Love My Color" on My Pink Stamper

This card started out being for the using scraps entry, but then I decided that it would be better for the monochromatic challenge.  The Challenge: make a monochromatic project with at least one flower.

These flowers were made using a technique I saw on Dawn's Stamping Thoughts.  I really like the way these flowers come together and the way they look.  I used CC-Walk in My Garden to cut the flowers at different sizes.  The punch is EK Success Double Crochet.  The papers are from Hot Off The Press. The finished card is 4-1/4" x 5-1/2". 

Saturday, May 1, 2010

NSD Challenge #1 - "Mother Dear, I Love You So"


It's going on midnight & it's time to go to bed.  But, before I do I finished this card for My Pink Stamper.  The Challenge: make a scrapbook layout, card, or other item for your mother or someone dear to you.

I took a lot of time deciding whether to us my favorite Basic Grey paper or not.  I decided to us it and not collect it.  This paper is from the Kioshi Collection.  The green behind the wheel barrow is not from this collection.  I used the card feature on Walk in My Garden and cut the card front to 5-1/2" x 5-1/2" with Design Studio.  The "Mum's Day" was cut from the Designer's Calendar cartridge, also in Design Studio.  I used a Sakura Gelly Roll pen in white for the flower centers and dots on the card.

NSD Challenge #6 - "Kids Craft Too"


So it's almost 9:30 PM and I'm just getting my first challenge project posted for the National Scrapbook Day Challenges at My Pink Stamper.  The Challenge: make something with a child or for a child.

This card start out being a card for the "Mother Dear, I love you so" challenge #1, but it just went a whole different direction.  I started making this card at 4:00 this afternoon, after a day of 2 hours of Zumba, and my son's ISSMA Orchestra Contest this afternoon.  I just couldn't get thing finished.  So 5 hours later, I decided I would use this as the childs challenge instead.

I'm going to give this card to my 15 yr old son.  I always use goofy words in sentences to see if he is paying attention or to annoy him.  Not very difficult to do when they are 15.  I'll give it to him tomorrow and see if he is paying attention.

The lobster is cut at 3" from "From My Kitchen".  The paper is from KI Memories Designer Paper Pad. The letters are cut from Alphalicious.  I cut all the pieces from Design Studio to get the right size and to see how every thing would fit before I cut them.  The black paper is The Paper Company, Black and the Blue is Die Cuts with A View, Blue #2.  The finished card size is 4-1/4" x 5-1/2".

Thursday, April 29, 2010

Flip Flop Thank You Card


I put this flip flop card together for my son's bowling coach.  They are finishing the year with a tournament last week and then a final banquet this weekend.  We were wanting to give him a gift card, so I volunteered to make the card.  I have to say the way my son signed it isn't the direction I was thinking, but but hey he's a kid and it seemed to work.  I'll keep him around.
This card is cut on Design Studio with the George cartridge.  I have to give credit where credit is due, my sister Susan made up the cut file.  After a little fooling around with it today I was finally able to put it together. I was very obvious, but my brain wasn't working that direction. So 1/2 hour later and 3 sample cuts later, I had it figured out.  I cut two pieces of the patterned paper (one upside down on the mat) and them matched them up and taped them together.  

Monday, April 26, 2010

Me and My Sister


Today is a Thank You To My Sweet Sister Day.  I had suggested to Susan that the new Create A Critter and Robotz cartridges were the cutest cartridges yet.  I'm not usually the one that likes the cutsy cuts, but these are just too cute.  So she bought both cartridges.  She decided she wasn't as fond of this cartridge - WHAT?, so she sent the cartridge to me.  Is she a sweetie or what? 

Yesterday afternoon we challenged each other to make some cuts from each cartridge and I put these together last night.  This is the perfect picture of me and my sister.  She is the greatest and I love her. OK, enough of the gushy stuff.
Thanks for the cartridge!!!!

Saturday, April 24, 2010

Mystery ATC


This is the last ATC that I have for a swap on Cricut.com.  I had been swapping with this great group of ladies for the last 14 months.  What a great bunch to be involved with.  For the last ATC, we had a mystery ATC challenge.  We each sent ours in with no names and then we each had to guess whose was whose.  I don't think I did a very good job, because Susan only guessed 4 correctly and we were pretty close on our answers.  It was very hard to figure out which card looked like whose.  I'm thinking we all did something radically different from what we usually do and tried to copy someone else's style.  I'm not sure. 

Mine was pretty simple.  I tried to keep it simple with just a few embellishments.  I don't know if this looks typical of what I make or not.  Well maybe the paper selection is me and well maybe the ribbon and OK probably the flower.  But, I was thinking that may throw everyone off.  Congrats to Vickie for guessing the most ATC cards out of everyone.

Wednesday, April 21, 2010

Heritage ATC


This was my take on "Heritage" for an ATC swap on Cricut.com. 

My aunt spent years putting together a book with our family photos and information.  It goes back to my mother's father's side to my great great grandfather, as well as my mother's mother's side.  I'm sure that my geneology buddies are going nuts.  I'm sure I'm not using the correct terminology for the ancestors, but hey.
Anyway, she had many pictures, newspaper articles, and even his Civil War information. She contacted relatives and accumulated a book at least 100 pages long.

These pictures show him in his later years.  They owned a farm with a great victorian farm house and all the out buildings you can think of. The really neat thing is that he didn't become a US citizen until he was 76 years old.  Can you imagine coming to the US when you are 14, living here, being in the army and being so patriotic and not being a citizen?  We are very lucky to have so much information and the shear number of photos is amazing.

Sunday, April 18, 2010

Journal


This is just another quick journal.  I have been using papers that I have had around for a while.  This paper was purchased when a local scrapbook store went out of business FIVE YEARS AGO.  I used a Fiskars border punch for the edge.

Paper Flowers Journal


This is a little journal I put together a week or so ago.  I love to decorate composition notebooks.


I wanted to try to make the paper flowers that Dawn makes on her blog: Dawn's Stamping Thoughts.  The link will take you directly to the video on her blog with the instructions.  I used flower cuts from the Walk in my Garden Cricut Cartridge.  I can't get over how easy these are to make and they look like the flowers that a certain well known paper flower manufacturer sells. I'm not namin' names.

Sunday, April 11, 2010

MPS Challenge (Pink, Green, & Black) Create A Critter Giveaway


This is my entry for the MPS Challenge at My Pink Stamper today.  The challenge is to use your Cricut and the colors pink, green, and black on a project.  I decided that I would decorate a mini-composition book.

The papers are from a stack I've had forever.  It is by a company called ATD.  I covered the outside of the book with the green paper and the inside covers with the pink paper using Mod-Podge.

The ladybug was cut at 2" from Walk In My Garden.  The scalloped rectangles were cut with Design Studio using Graphically Speaking and the letters are from Alphalicious.  I cut the letters on Design Studio too.  After putting all of the pieces together, I used pop dots to attach to the front of the notebook.

The finished notebook is 3-1/2" x 4-1/2"

Lily of the Valley


I've been playing again.  I downloaded another Twisted Papers design.  I am patiently waiting for my real Lily of the Valley to start popping up.  They are being a little stubborn.  So while I waited, I thought I would play around with this design.   I printed the bottom layer and then fussy cut the second layer around just the bouquet.  Then I cut out each individual white bloom and used small pop dots and glue to apply the third layer at different angles.  Luckily, my friend had some rafia laying around, so I tied a little on top of the layer for an added touch.

I used the Cuttlebug Dotted Swiss folder to emboss the green outside layer.  I also used my friend's new EK Success Double Crochet Border Punch to punch the edge.  Sorry to do this, but here is the link to see their border punches: http://www.eksuccess.com/products_list.php.  It looks as though they have a lot of new punches. OK, now I'm really sorry, I want them all.  I really love this punch.  She should probably double check her punch collection today to make sure she still has it - DOES SHE? 

The finished card is 4-1/4" x 5-1/2".

Mauve with Movement


This month's theme for Card of the Month on Cricut.com is Mauve with Movement.  I used Cricut Design Studio to cut the outside layer and the mauve print on the front with the slot to move the butterfly.  The butterfly was cut from Home Accents.  The outside solid mauve is cut 5-1/2" x 8-1/2".  I scored the piece at 2-1/8" from both ends, folded them and taped the ends together on the inside of the card.  I cut the sliding green cardstock piece and inserted it in the outside layer.  I then stamped Get Well in the slot window and used a pop dot to connect the butterfly to the green cardstock.


Tuesday, April 6, 2010

Pansy Card


This is the third card I made using an image from Twisted Papers.  I used a Fiskars border punch for this card.  The finished size is 4-1/4" x 5-1/2.

Friday, April 2, 2010

Easter Joy


Another card with an image from Twisted Papers.  I think I am getting the hang of the camera a little bit.  You can at least read the writing on the card now. 


Sunday, March 28, 2010

Easter Card


It's Palm Sunday & I am actually getting ahead on some projects I wanted to work on.  I made this card for my mom for Easter.  Her favorite flowers are Daffodils, so I couldn't resist.

I was inspired by Cindy Royal's cards she shows on her blog:  http://www.royalthings.blogspot.com/.   She creates the most incredible cards.

I purchased the Daffodil Easter pic from Twisted Papers.  Their web site is: http://www.twistedpapers.com/.  They have hundreds of vintage card fronts to download for a nominal price. They also have a great monthly newsletter that you can sign up for that offers free downloads every month.

After downloading the pic and printing it, I fussy cut the entire bunch of Daffodils and then cut some individual flowers and triple layered them with pop dots.  The top layers were adhered at an angle.  Sorry the pic doesn't show the depth (still working on camera settings).

I ran the flower section through the Cuttlebug using the Cuttlebug Swiss Dots folder and then the yellow was embossed using Quickutz Diamonds & Dots folder.  I thought that it looked a little like a trellis.

I cut the corners using EK Success Cardcreator Interlaced corner punch. These punches are made to cut all four corners of a card without cutting both layers of the card.  Although I ended up cutting both layers anyway when I realized that you can't write on dark green cardstock.  If you want to see how they work and other styles, you can find them on http://www.eksuccess.com/ . They have a great website with easy to follow how-to videos.

Thanks for looking.

Tuesday, March 16, 2010

Seafoam w/String


Seafoam w/String

February's Card of the Month swap theme was Seafoam with String.  I had all kind of ideas about the ocean and water and the usual, but I have to admit that my final idea came from a card that I saw in Archiver's last month.  The link to the card and instructions for their card is HERE.

As you know I have been trying to use supplies I have on hand, so I didn't spend the $$$ to make Archiver's card as they showed it.  Instead I used the Bird on Stems Cuttlebug folder I have had for a long time.  I inked the folder on the raised side with Versa Magic Chalk Ink using the colors: Spring Pansy, Sea Breeze, Aquatic Splash & Aloe Vera.  Then I ran it through the Cuttlebug using two pieces of white cardstock.  I think using the two sheets of cardstock inked the page better.  I used string & eyelets that I've had forever to finish off the card.  The finished card is 4-1/4" x 5-1/2".

Saturday, March 13, 2010

Project 365 Layouts


I finally got my first two layouts done for the Project 365.  I've had them done for a week or so, but I was having trouble taking a clear picture.  Pretty ironic when this project is about taking better pics..... LOL.  I was excited to use some of my Cricut Cartridges that I haven't used before.  Pretty bad when you have had them for a while & not even used them.  I used the flourishes from Home Accents.  I cut them and then cut chipboard to bring them out a little.  I used Printing 101 for the day numbering on the second layout.  I'm trying to get caught up, and think that I'm on my way now.

Friday, March 12, 2010

Cards for Soldiers

I was working on some cards for soldiers yesterday and used another cartridge that I forget about all the time.  Graphically Speaking is such a great cart.  There a lot of simple cuts that are great on cards as well as layouts.  If you are interested in making cards for soldiers, you can find the information on the Cricut website HERE.  This thread has the current 'challenge'.  Please take a look as see what they are up to.  It is a great way to support our soldiers and it means so much to them.  If you are interested, just post to the thread & the gals there will get you all of the information.


Sunday, February 21, 2010

Jewel ATC

 March's ATC theme is Jewels.  This was another quick card.  It is a cut from the Storybook cartridge sized to 2.5" x 3.5" with Design Studio.  I added the jewels for the eyes.

Saturday, February 20, 2010

Project 365 Title Page


Finally - I have the title page done for my Project 365 Book.  Susan & I spent a long time discussing how we were going to do our pages as far as a background paper goes.  The picture is one that I took a few years ago before owning my digital camera.  This butterfly was having a really great time posing perfectly for me that day.  Then a few minutes later a praying mantis landed & I was able to take pics of that too. 


Anyway, I like to take pics of weird insects that I find around the yard in the summer so I will probably incorporate some of them into the Project 365 book.  I'm on my way & hopefully it won't take me a week to do one 12 x 12 page or I will never get this done.... LOL

Monday, February 15, 2010

Sewing ATC


I almost forgot to post the ATC for February's ATC Swap on the Cricut message board.  The theme this month was "Sewing" I know it doesn't look too complicated, but I had to remember how to use my sewing machine.  It has been a few years since I did a real sewing project.  The material was leftover pieces I used to sew my Cricut dust cover with trim that I have had laying around for years.  The buttons came from my Mom's collection.  You know the collection.  Growing up, before we got rid of any clothing, we took the buttons off if they were interesting or might be able to be used for a fill-in for a lost button.  When Mom gave me her machine & cabinet the button boxes came with them.  I have two old checkbook boxes full of buttons and was glad that I was able to use 14.  Now I'm down to 500....

Friday, February 5, 2010

Designer's Choice - C.O.M.


 I finished the Designer's Choice card for the Card of the Month Swap on Cricut.com.  The thread is here.  January's theme was Designer's Choice.  So we were all able to choose our own alliteration for the month.  Everyone gets a chance to guess what the color and embellishment combination is for your card.  Mine was Purple with Parallelograms. Be sure to look at past months cards. We have some really great card makers in this swap.

 The design of the card came from a special Paper Cafts Magazine called Paper Crafts Remodeled.  I have wanted to use this design for a long time.  They have some awesome decorated bags as well as cards with this design and different embellishments. Simple, but cute.

The paper is from a giant 300 piece box from K & Company.  I got the box with a 50% coupon last fall.  It has a huge variety of papers and I was glad I was able to make some work.  The green & teal were from a Martha Stewart pack.  I cut the circles with the George cartridge on my Cricut.  I was having a little problem with the circles looking like circles, they turned out a little oblong.