Sunday, November 29, 2009

Christmas Gift Card Holders

 I finished these gift card holders at the last minute yesterday morning for our family Christmas gift exchange.  No, you didn't miss Christmas, we just did it a little early this year.  I borrowed Susan's Sports Mania cart for the golfer and golf tee.  I am always surprised by the huge number of choices on each Cricut cartridge.  I cut a golf ball too, but couldn't figure out how to fit it on the card - I'll save it for later.  I also used some Basic Grey papers I have been hoarding for a while. I love their papers, buy them then have a hard time using them, because I love them so much.


I used dark blue paper that I ran through the Cuttlebug using a Fiskars embossing plate.  Not the most exciting creation, but it worked.  The brads are from Making Memories.  I've had them around a long time & asked Robert to give them back to me so I could use them again.  He's a teenager, he thought I was just being weird.


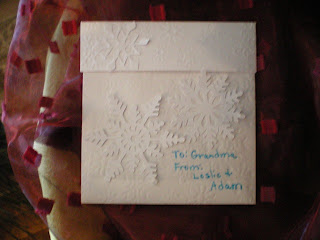
I used the "When it's Cold Outside" cart to make Mom's holder.  I cut the snowflakes out of a single piece of white cardstock to use as a template to sprinkle powdered sugar over a pumpkin roll I baked for Thanksgiving.  The top snowflake was from another project.

If you get a chance to really look at "When it's Cold Outside", you can see how really clever the snowflakes are.  These were simple, but the majority have hidden items that make up the snowflake.
For Jessica's holder, I used a cut from the "Christmas Cheer"cart.  I saw this tag idea in PaperCrafts Magazine and really liked the idea of Santa's jacket on a hanger.  I used Snow Writer for the white areas on the jacket.  It was a little different than I had expected, kind of sandy, almost like grout rather than fluffy snow.  It still turned out OK though.

I hope you had a great Thanksgiving and thanks for stopping by.

Thursday, November 26, 2009

Mom's Christmas Cards


I finally finished the Christmas cards I made for my Mom & Dad for Christmas.  I have been trying to make cards for them to send every year.  I think I missed last year...

I used white and blue cardstock.  The stamps are Hero Arts Clings - Snowflake Circle & Stampendous - Cling Snow Brackets.  They are stamped with Sky Blue Color Box Pigment Ink and embossed with Ranger Holographic Embossing Powder.   The extra snowflakes were cut on Cricut, stamped & embossed the same as the snowflake stamps.

I have to thank both my friend Joyce & my sister Susan for putting up with my glitter embossing addiction.  Although Joyce found it easier to vacumn after I left her house because she could see where she had already swept.  Susan will probably never get the glitter out of her kitchen.  I had a little dropping problem.  Needless to say she & the kids all will be glittered for a while.

The card is an easel card from SplitCoastStampers.  I'm really sorry I can't give credit where credit is due, but I can't find the link.  It is an A2 card creased at 4-1/4" & 2-1/8".  I placed small snowflake buttons/embellishments to hold the card open with glue dots.

Tuesday, November 17, 2009

Star ATC

Wow, two posts in one day.

I created this ATC card for a swap also on the Cricut Message Board. There are a lot of very talented, creative ladies participating in this swap. You can see all the ATC's for the month of November at  Karen's Blog.
I used Cricut Design Studio to cut the ATC with the star shape inside. The whole piece is 2.5" x 3.5" with the star cut at 2".
I actually used only paper I had in my huge collection. There are 5 different patterned papers for the star using Iris Folding. The pattern for the iris folded star was at Handcrafted Greetings. Judy Headrick has for or five different iris folding shape designs in .pdf format to download. It makes it very easy to do the folding since the shape & math is already done for you. I do have to admit that this was a very tiny pattern and I used an entire Quickie Glue Pen completing 14 ATCs, but I was very happy with they way the turned out.
I apologize for the links showing as links. I need to spend a little time experimenting with that so that it shows as a word instead.... Hummmm.

Lime with Lace


I've been at it again. I worked on this card this weekend during a mini-crop at a friends house.
This is for the Card of the Month swap on the Cricut messageboard. The "challenge" for the month of December is Lime with Lace. I'm posting a little early because I actually have them done way ahead of time, very different concept for me.
I was excited to have a reason to purchase this paper. It is green, my favorite color, and the spirograph design took me back a little. The paper is by KaiserCraft, Spirograph P347 Rosette. I couldn't resist. I purchased the P344 Spiro paper too. They have great second sides on both papers so don't forget to take a look.
I am guessing that a few of you remember trying the spirograph kits years ago. I couldn't get a completed design to save myself, so I think this paper is letting me cheat a little. I think my parents still have the kit somewhere in the basement of their house. Maybe I should take a look and see if I could complete a design now - huh.
Anyway, the lace part of the card was punched with a Fiskars boarder punch. I choose the Effervescence Border Punch. I don't buy a lot of border punches, but I thought this could be used for more than just a lacey border.
I was also lucky that my sister forced me to take a look at the $1 rubber stamps at Michael's last week. I found the perfect spirograph flowers. The stamp is by Janet Dunn for Studio G. For a $1 I thought I got a great deal.
The finished card is 4-1/4" x 5-1/2".